In today’s fast-paced educational environment, teachers are always looking for effective ways to connect with their students and foster a collaborative learning atmosphere. Edmodo, a social learning platform, offers a perfect solution by allowing educators to create virtual classrooms.
This blog post will guide you through the process of setting up Edmodo groups for your class, ensuring a smooth and engaging learning experience for both you and your students.
Step-by-Step Guide
Creating groups on Edmodo is a great way to enhance communication and learning in your classroom. Here’s how to get started:
Step 1: Log In and Access the Dashboard
Once you’ve registered and logged in, you’ll be directed to your dashboard. This central hub is where you can manage classes, assignments, and interactions. It’s designed to give you a quick overview of your teaching activities and student progress.
From here, you can navigate to different sections of Edmodo, customize your profile, and set up notifications to stay informed about student activity and submissions.
Step 2: Create a New Group

- Find the “Groups” section: Look for the “Groups” tab on the left-hand sidebar of your dashboard. This section consolidates all your groups, making it easy to manage multiple classes or subjects from one place.
- Click “Create”: Select the “Create” button to start the process of forming a new group. This opens a simple form where you input the details of your new group, laying the foundation for a digital classroom space.
Step 3: Customize Your Group
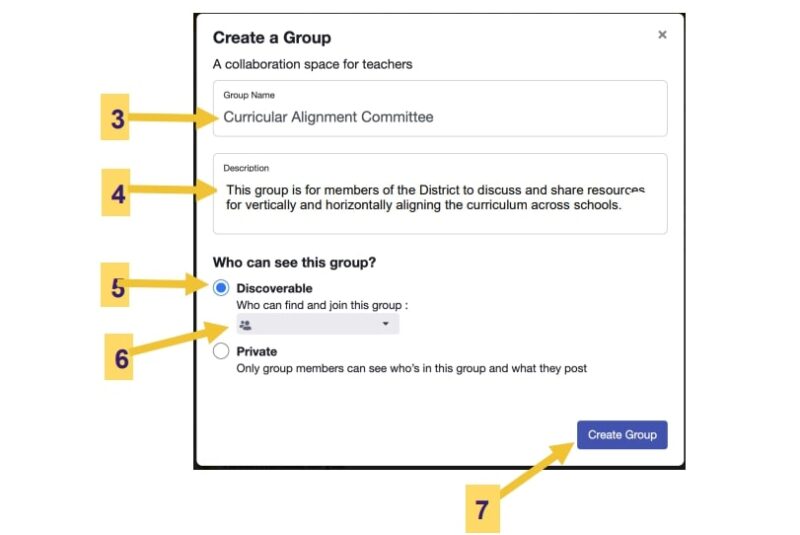
- Choose a Group Name: Pick a name that clearly identifies the purpose of the group, such as “Math 101 – Fall 2024”. A clear and concise name helps students easily identify and engage with the group. Consider including the term and year in the name to differentiate it from past or future groups.
- Select a Grade and Subject: This information helps categorize your group, making it easier for students to find. It also assists Edmodo in providing relevant content suggestions and resources tailored to the group’s focus.
Step 4: Configure Group Settings

Decide who can join your group. You can set it to “Private” to require approval for each member or “Public” to allow open access. This level of control helps maintain a safe and focused learning environment, ensuring that only intended participants can view and contribute to the group’s content.
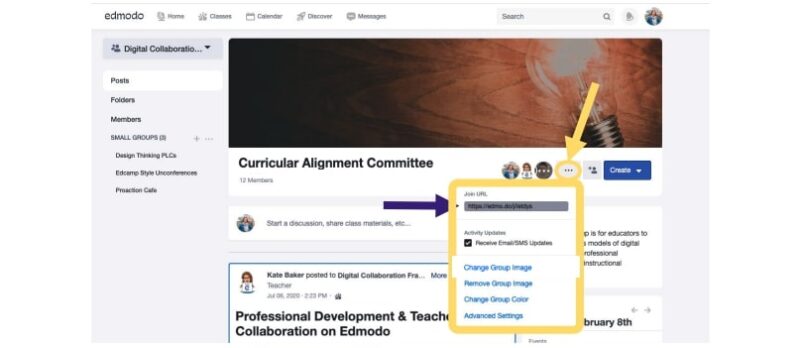
Edmodo automatically generates a group code. Share this code with your students so they can join. This code is crucial for managing membership and maintaining privacy, acting as a key for students to access the group.
Step 5: Add Content and Resources
You can upload files, links, and resources relevant to your class. Organize these materials into folders for easy access. This digital library becomes an invaluable resource for students, allowing them to review materials and complete assignments at their own pace.
Create Assignments and Quizzes
Edmodo allows you to create assignments and quizzes directly within the group, facilitating a seamless workflow. This feature not only helps in assessing student understanding but also in providing a diverse range of learning activities to cater to different learning styles.
Step 6: Invite Your Students
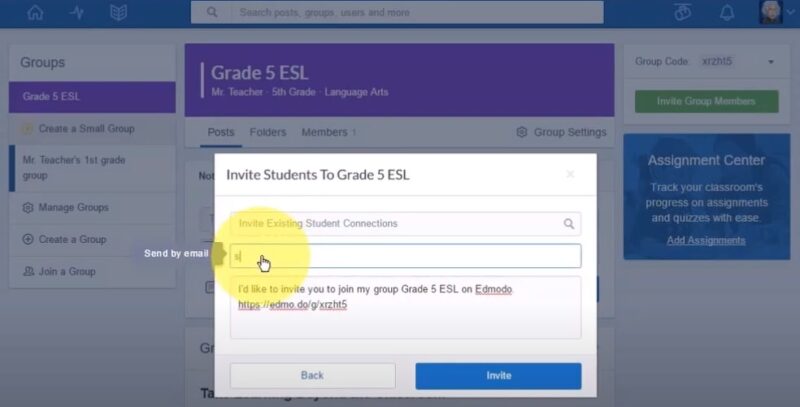
Distribute the group code to your students via email or in person. They’ll use this code to join the group. This is a critical step in building your classroom community, ensuring all students have equal access to the group.
If your group is private, approve each request to ensure only your students gain access. This vetting process is essential for creating a secure online learning environment where students feel safe to participate and share.
Step 7: Engage Your Students
Post questions or topics to spark engagement and encourage interaction among students. This interaction fosters a sense of community and allows for peer learning, where students can benefit from diverse perspectives.
Use Edmodo’s tools to give real-time feedback on assignments and quizzes. Timely and constructive feedback is vital for student growth, helping them understand their strengths and areas for improvement.
Step 8: Monitor and Adjust
Utilize Edmodo’s analytics to monitor student participation and performance. This data provides insights into how students are engaging with the material and where they might need additional support. Based on feedback and performance, adjust the resources and activities within your group to better meet your students’ needs.
This flexibility allows for a dynamic learning environment that evolves with your students’ educational journey.
FAQs
Can I create multiple groups for different sections of the same course?
Yes, you can. This allows you to tailor the content, assignments, and discussions to each specific group of students, providing a more personalized learning experience.
Is it possible to merge two Edmodo groups into one?
No, Edmodo does not currently support merging groups. If you need to combine groups, you’ll have to manually add students to the desired group and transfer any necessary content.
How can I monitor student activity within a group?
The platform provides teachers with tools to monitor student activity, including who has viewed assignments, participated in discussions, and submitted work. This feature helps teachers track engagement and identify students who may need additional support.
Can parents join Edmodo groups?
Parents cannot join groups in the same way students can, but Edmodo offers a feature for parents to connect to their child’s account. This connection allows them to monitor their child’s assignments and progress without participating in the group directly.
What happens if a student forgets the group code?
If a student forgets the group code, the teacher can easily find and redistribute it. Teachers can access the group settings to view the code and share it with any student who needs it.
Can I schedule posts or assignments in advance in an Edmodo group?
Yes, the platform allows teachers to schedule posts and assignments in advance. This feature is particularly useful for planning your curriculum and ensuring that materials are released to students at the appropriate time.
Final Words
Creating Edmodo groups for your class offers a dynamic platform for enhancing communication, collaboration, and learning outcomes. By following the steps outlined above, you can set up your group, engage your students, and create a supportive online community.
As educators, understanding and preparing for the myriad expenses beyond tuition, such as technology and materials for your digital classroom, is crucial for a financially sustainable educational experience.
Embrace the potential of Edmodo to bring your classroom into the digital age, fostering an interactive and inclusive learning environment.